Pages

Wednesday, 27 November 2013

Turn your social media pics into wall art with Faceblocks

I do a lot of random browsing of the web when looking for inspiration and I came across PrintWild, a canvas printing service provider, offering a very intriguing new product. Faceblocks enable you to turn any of your social media photos into a work of art! Obviously it's not limited to your social media accounts, as they do offer uploading from Dropbox and normal uploading - but it is definitely aimed at the social media bunny (like myself) who loves to catch beautiful moments and put them on show - be it on Facebook, Twitter, Flickr, and now, in your own home. Faceblocks are 15 x 15cm wooden squares with your printed picture on them, ready to put up in your home and enjoy.

The whole process was super easy, the hardest part was containing the excitement until it arrived at my doorstep! You simply log in to your social account, select the photos you want to print, arrange delivery and pay online. My Faceblocks arrived within a week later and I can't wait to put them up!


Now to decide how to arrange them and where to put them! Any suggestions?


Monday, 25 November 2013

The Rocky Horror Show celebrates its 40th anniversary

The Rocky horror picture show has always had a special place in my cultural upbringing; it crossed socially constructed lines, it blurred gender roles, and it eliminated the need to put sexuality in a box and neatly label it. The first time I watched it, it was already 30 years old, but still posing relevant questions about the rigidity of our stifling, conservative society. Now ten years later, I watched enthralled as it was brought to life again at the Fugard Theatre for its 40th anniversary. 

South African audiences raved about it month after month, causing it to be extended until January 2014 to sate the unsatiable appetite of the Capetonian theatre-lovers. I absolutely loved this rendition of Rocky Horror Show, Brendan van Rhyn's interpretation of Frank n Furter was both instantly overwhelming and instantly lovable. (originally made famous by Tim Curry who played this role when the play debuted at the Royal Court Theatre in London in 1973). Needless to say I watched it twice! 


Audience members don rocky horror inspired costumes and can participate by buying participation packs that enable them to act out scenes with the actors similar to the way cult followers have year after year overseas in annual Halloween screenings. 

Our dress up night:

Saturday, 23 November 2013

Red Basil in my window sill

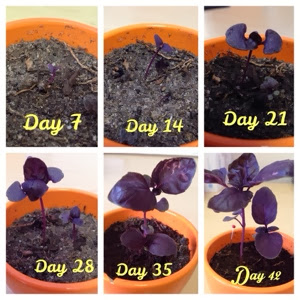
One of the most rewarding things to do regarding gardening is to grow a plant from seed. I very seldom have much luck but 6 weeks ago I decided to grow Red Basil in my office window. 

A little bit of soil, a little bit of water, and a whole lot of love and in just a few days my little Basil broke the crust of soil. I turned it into a photo project: take a look at Basil's progress. 


Thursday, 21 November 2013

An Indian Wedding Part Two

Every wedding guest knew that this would be an occasion to remember, a place and time where cultures and traditions would come together in the celebration of a truth universally known - love. The bride to be is Muslim and Indian from humid Durban, the groom brought up Christian in the suburbs of Edgemead - the wedding day would be a melting pot of religions, traditions, and expectations! And it was stunning, the day brought together 150 people to celebrate in the union of Su & Jacques on their special day.

The Tale of Two Dresses
An Imam performed the wedding ceremony beautifully and with feeling, and involved the whole congregation, mixed in religion as we were, by uniting us by the foundations of each our own faith and spirituality. Shivers went down my spine and goosebumps raised all over my arms when I heard the familiar proclamation "I do" followed by a more masculine "I do", and it was official.

Having not snuck in to see the bride before the ceremony, I had no idea how stunning she would look walking down the aisle to an Indian instrumental wedding march in her red wine wedding Sari, heavy with blinking jewels and intricate designs - she was a blushing beauty to behold! Later she re-appeared for the speeches, dinner, cutting of the cake, bouquet and garter tossing, in a sleeveless figure hugging white wedding gown with trailing princess train.


The Floral arrangements
Colour is an integral part of Indian weddings and this was no different! Gold bowls overflowed on each table with beautifully paired flowers, roses nestled against proteas as if that made total natural sense. I love flowers, in the garden and in my home so I was thrilled at the incorporation of rose petals to adorn the "chapel" floor. Incidentally, it may have something to do with why I caught the bouquet ;)

We had an awesome time, dancing until late (long since kicked off our shoes) and partaking in the festivities. Here's a picture of my boyfriend and I from the photo booth that was set up while we waited for the couple to have their photos taken.


Wednesday, 20 November 2013

An Indian wedding: Part 1

Last week I had the most incredible experience, I attended an Indian wedding - my first. I have never looked forward to an occasion such as this with as much anticipation and excitement. I broke this experience into two parts, starting with the mehndi celebrations that were held the night before the wedding. 

The Mehndi Celebration
This celebration is an elaborate, joyous and colourful pre-wedding ceremony held in honour of the bride at her family home. Both the bride and groom attend for blessings from the brides family and close friends, while the bride and female guests are decorated by elaborate henna or mehndi tattoos. 
My hand just after being painted and the following morning after it has dried, flaked off, and stained darker. 

I found it heartwarming to watch as family members and friends went one by one to bless the bride and groom (separately), stooping to select a sweet treat to feed them and gathering a spice and oil mixture to smear on the couples face, arms, and feet to cleanse them. Then blessing them and tossing either a flower or a cash gift over their heads into a suspended gauze scarf. 
I adored the beautiful colours on every sari, punjabi, backdrop, and flower streamer, an image that for me will always be synonymous with an Indian wedding. 

Monday, 11 November 2013

Growing garlic in a South African garden

Green fingers are overrated, now what you should want are dirty fingernails because let's face it... That's what we look like after hours of toiling in the garden! 

I have a tiny, bucolic front garden with copious amounts of tiny pot plants and planters with flowers, cacti, veggies and herbs planted helter skelter. And I love it. 

Now let's get to growing garlic in a South African climate:

What you need:
You will need to buy cloves made for the purpose of home growing because the garlic you buy at retailers is almost always engineered to be sterile. 

Planting: 
You can grow garlic in planters if that's all you've got, I preferred it so that I wouldn't lose any garlic when it came to harvest time! Plant your garlic about 10cm deep and 10cm apart, if you have clayey soil or you are using a planter make sure that the soil is well-drained to prevent the garlic bulb rotting. Mix river sand into clayey soil and make sure planters have holes in the base. 

Harvesting: 
Plant in Autumn and harvest 9 months later. The leaves will die off mostly but try not to pull them off for two reasons:
     1. It helps you find all your bulbs!
     2. As the leaf dies so the bulb absorbs it's nutrients until the end

Curing:
Cure the garlic for two weeks with the leaves attached in a dry place out of the sun. This helps bring out the flavor and allows it to be stored for longer. 

Pickling:
If you would prefer to pickle your harvest then peel and wash every clove and store in a jar of white wine and white vinegar so that it covers the cloves. The ratio of wine to vinegar is half and half. Store the jar closed in the fridge, it should keep up to 6 months. 

My first harvest!


We used rosemary to infuse some more flavour


Tuesday, 5 November 2013

Video pick of the week - The Hobbit Part 2

I seriously can't believe how fast time flies. Already we can start getting amped for the second part of The Hobbit trilogy and I couldn't be more excited. The movie is said to be released early December, so I'm not entirely sure when it will be gracing our South African theatres but be sure to return here for my review! Until then, here's the preview. Be prepared to have heart palpitations!


I was devastated when the Lord of the Rings Trilogy ended, I wasn't ready to vacate the realm of Middle Earth for anyone! So The Hobbit is My Last Stand.  What are your feelings about The Hobbit trilogy? Comment below and share your thoughts.

Monday, 4 November 2013

Soft, uncomplicated parings

I'm no fashion guru and I don't pretend to be on top of the latest trends but I do love clothes and have the tiniest of online shopping addictions... But I call it like I see it, so here goes.

I love paring soft and simple colours together. A plain non-patterned blouse with soft colored pants, jeans or skirt is a definite winner. Making a major imprint on fashion at the moment in South Africa is peach and mint, just like my hi-lo dress from Foshini (last summer season). I paired it with three quarter army green jacket from Jay Jays (also an oldie but a goodie). 

Also for your pleasure, my beautiful rose, picked freshly from my now-sprouting Summer-garden. 


Friday, 1 November 2013

Painting nice n neat stripes on your walls

There are cheap and easy ways to paint stripes on your walls by hand and there are more complex and somewhat more expensive ways. I didn't have the patience or will to waste money on 'specialised' tape or lasers, my list of tools was short, sweet, and blissfully available.

All you need is:

  • pencil
  • masking tape
  • measuring tape
  • your desired paint colour for the stripes
  • paint, the exact match to your existing wall colour (you'll see why!)
  • faith in yourself

I painted stripes in my tiny upstairs bathroom. The vertical, light-coloured stripes made the room appear larger and more friendly. 

I started by measuring the distance between stripes with my measuring tape and making marks with my pencil. 

I then used the masking tape to make the stripes. I know this sounds kind of counter intuitive but make sure it's not too sticky as it may pull chunks of your paint out when you remove it. 

Here's the Big Secret to preventing your painted stripes from bleeding or appearing jagged. Go over the inside edges of your masking tape with your wall colour (mine was white) and go just over the tape. This seals the space between the tape and the wall, and if any of that paint goes through you won't notice it as it's the same colour as your wall! 

Paint as many coats of your stripe colour as you need until you have the desired effect, when dry GENTLY pull the masking tape away from the wall and you will have perfect stripes! 

Here I am giving it a bash. That's my painting jersey so don't judge my fashion sense :P